Search This Blog

Friday, 30 August 2013

Merry Christmas pop n cut card...

Only 117 sleeps to Christmas:)


For the card base I used the sizzix horizontal A2 base with the Karen Burniston circle insert. The tree which comes with a matching embossing folder is a sizzix bigz die Christmas tree #2. The train is from a sizzix phrases decorative strip called planes, trains and automobiles, I die cut 2 trains and just hand cut the truck to fit. I used Tim Holtz alterations mini paper rosette die for the train track and the background for the Merry Christmas. The merry Christmas is a cheery Lynn die.


Merry Christmas Karen Burniston 3D tree...

There are only 16 Fridays left to Christmas so I thought I'd make a start on my Christmas cards:)


Wednesday, 21 August 2013

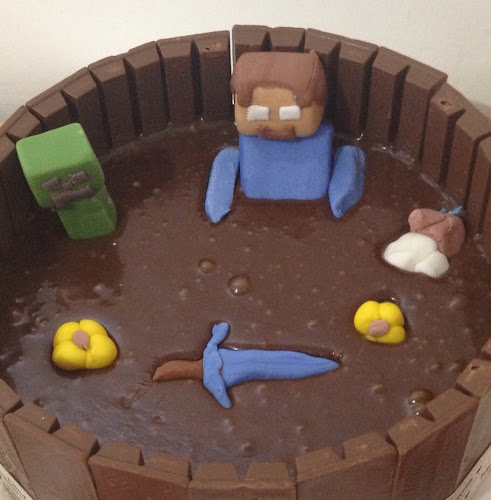
Minecraft birthday cake...

I had already seen a cake I wanted to make on pinterest but my children decided their dads cake needed to be a minecraft one! So we compromised, I made the cake and they made the minecraft accessories!


The original cake was supposed to look like this one:


pig-cake-in-blog-700

from this blog. I will definitely be visiting their blog again...yummmm


Minecraft box...

This is for a friend of my daughter who is sadly moving away. I decided that i would make him a memory box rather than a leaving card.

I used some ivory and black coloured mount board and cut the pieces out using my Eileen Hull's square box xl scoreboard die. For the named bunting I used Karen burnistons flagpole die. The lettering is from a cuttlebug typewriter alphabet die set.

I glued a little 3D surprise inside the box using a skin template I found on Pinterest.


Hexagon quilt chair cushion...

You may have noticed in my blog header that it has a hexagon quilted chair cushion. Thanks to the tricks of modern photography although it looked like it, I hadn't actually finished it until this week. As I've never quilted before I simply didn't know how to finish it and make it look like a fairly reasonable attempt. I received a quilting book from a friend recently and thought I'd flick through to see if there were any tips. Yay, success there was, so armed with said book and my trusty old sewing machine I set to work.
I cut card using the 1 1/4 inch hexagon sizzix die. Each hexagon is about 2 1/2 inches in diameter. I then hand tacked squares of material around each hexagon, before hand sewing each hexagon in place.
Next I laid the completed hexagon layer on top of wadding which was on top a sheet of spotty cotton. I pinned all three layers together.
It was a little fiddly but the next step was to cut the wadding to the shape of the hexagon layer.
My next step was to sew around the edge of hexagon layer and attach all three layers together.
Because I wanted it to be a little thicker I then layered the cushion with another layer of wadding and more spotty cotton. I arranged the spotty cotton layers right sides facing and pinned them in place before sewing around the edge of the hexagons (see no11). I left an unsewn 10 to 15 centimetre gap to turn the cushion the right way out.

The final part which took the longest was to sew around the individual hexagons.

Monday, 12 August 2013

Chocolate pop n cut mug...

As one of my very best friends has been really poorly, I wanted her to know how much she means to me, so I created this using my new Karen Burniston pop n cut mug insert.


The cream on top of the mug was made using a sizzix cloud die covered in stickles 'stardust' glitter glue. I hand cut the hot chocolate dribble and covered that with some anita high gloss embossing liquid and more stickles glitter glue.


The quote is mounted on a sizzix fancy label frame die. The Bourbon biscuits were made using a domino embossing folder and then cutting each one out by hand.


I achieved the chocolate bar effect by using a crease pad with a silicone pad and the smallest rectangular framelit die I have. (don't forget to put the other cutting pad on top like I did or it won't work!)
 
 
I used Microsoft word to create my quote which is in harrington font. I found the quote on my favourite online place.. Pinterest:)

 
and the inspiration for my chocolate theme; My daughter made herself a very yummy looking hot chocolate with marshmallows (and she wouldn't share with me, I bet my friend would have!)


Happy birthday pop n cut mug...

This card is for my hubby who is really old this month;)


I didn't have the right size framelits for the happy birthday to sit in nicely, so I cut the blue using the Karen Burniston pop n cut label insert and just trimmed it. The black part of that sign was cut using one of the sizzix fancy framelit dies, and the green part I just trimmed by hand. The happy birthday is from my tattered lace sentiments block and the 40 is from my cuttlebug typeset alphabet and number set.

 
I had at hand one of my favourite strip dies for the flag pole and 'daddy' bunting.The froth on top of the beer was created by using a cloud die cutter.
 
 
I wanted to replicate this traditional beer mug so used a sheet of acetate and repeated the same technique as on the chocolate bar in my hot chocolate mug post.


Saturday, 10 August 2013

That darn cat...

Sometimes the cats feels very neglected!!

And if that doesn't work...


Friday, 9 August 2013

Bits n bobs Eileen Hull box...

I needed a scraps box so used this Eileen Hull die and put some of my favourite Lucy Cromwell paper on it.


Tuesday, 6 August 2013

Wedding anniversary fancy flip-it card...

This is my experiment with acetate sheet card. I originally wanted to try making an accordion album type card using framelits as I'd seen Karen Burniston demonstrate it on youtube. But would you believe it framelits don't cut acetate!!
So this is made using a Stephanie Bernard fancy frame flip-it's die, as it is a sizzix bigz die it cut the acetate beautifully. The lettering is the sizzix petite petal strip alphabet die.

Saturday, 3 August 2013

Tooth fairy candy cup...

The tooth fairy hasn't been very reliable for my oldest children, so now the youngest one is getting her first wobbly tooth I thought I'd better be more prepared. This households tooth fairy prefers to collect from purpose made tiny pillows instead of underneath children's pillows!!

I searched and searched for 'mat board' as I'd seen that is what crafters use when making their more sturdy creations but couldn't find any anywhere. My good crafty friend over at diningroomdrawers told me to use 'mount board'. So after a little trip to HobbyCraft I now have some cream and some black board.

I used Eileen Hulls candy cup sizzix scoreboard die to make the tooth holder, and my favourite decorative strip die that cuts flag poles and bunting. I hand stitched the tooth pillow using some inch thick satin ribbon and a little stuffing. The tiny buttons are actually some very cute brads I picked up at graftoncrafts.